Find Contours in Image using OpenCV
Contours are one of the essential topics in image processing when working with OpenCV. They play important roles in various computer vision tasks such as shape analysis, object detection and recognition. In simple terms, contours can be defined as a set of continuous points along an object's boundary with the same color or intensity.
In OpenCV we can use findContours() function to obtain contours for objects in an image. It is recommended to take binary images as input for this function for better accuracy. Moreover, we can use the supplementary function drawContours() to visualize the contours by drawing them on an image.
The signature of the findConours() function is as below in OpenCV:
findContours(image, mode, method [, offset]]])
| Parameter |
Description |
|
image
|
The input image, generally a binary image in which contours need to be detected. It is usually expected to be an 8-bit image with one channel.
|
|
mode
|
Contour retrieval mode. It can be obtained using RetrievalModes
|
|
Method
|
Contour approximation method. It can be obtained using ContourApproximationModes.
|
|
offset
|
Optional offset by which every contour point is shifted. This is useful if the contours are extracted from the image ROI and then they should be analyzed in the whole image context.
|
The above method returns two values as output. contours and hierarchy. These two parameters are summarized in the following table:
Output
|
contours
|
Contours are returned as a vector of points. Since, the contour is a boundary containing points, therefore, for each contour, the points are separately stored. Also, each contour is given a unique index (ID) which can be used to access it.
|
|
hierarchy
|
This is an optional output vector. If there are multiple contours, such as an object with a hole, then there will be two contours: outer contour and internal. The hierarchy is stored as a vector of Vec4i. The information is stored in the following format:
[next, previous, first child , parent]
Next: Id of next contour at same level.
Previous: Id of previous contour at the same level.
First Child: Id of the first child.
Parent: Id of the parent contour.
|
We will discuss the contour hierarchy a bit later. First, let us see an example for better understanding how these contours can be obtained from an input image.
Code 1 shows an example of detecting contours using findContours() method and displaying them using drawContours().
Code 1: Detecting and displaying contours in OpenCV
 1
 2
 3
 4
 5
 6
 7
 8
 9
10
11
12
13
14
15
|
import cv2
import numpy as np
try:
    path = r'F:\img\ rect2.jpg'
    img = cv2.imread(path, cv2.IMREAD_GRAYSCALE)
    thresh, BW = cv2.threshold(img,50,255,cv2.THRESH_BINARY + cv2.THRESH_OTSU)
    contours, hierarchy = cv2.findContours(BW, cv2.RETR_EXTERNAL, cv2.CHAIN_APPROX_SIMPLE)
    temp = np.zeros((img.shape[0],img.shape[1],3), dtype = np.uint8)
    cv2.drawContours(temp,contours, -1,(0,0,255),1)
    cv2.imshow('Original Image',img)
    cv2.imshow('Contours Drawn',temp)
    cv2.waitKey(0)
    cv2.destroyAllWindows()
except:
    print('Unable to read image.')
|
Line 1 and 2: We start by importing OpenCV and numpy libraries.
Line 3: This line defines a try block. The exception block (Line 11 and 12) is associated with this block. If any exception occurs, it throws it, and the code in the exception block is executed.
Line 4: Define the path of the image to read.
Line 5: Here we read a grayscale image (see the second parameter).
Line 6: Performs thresholding to obtain a binary image. It returns two values, a threshold used to perform thresholding and the resulting binarized image.
Line 7: In this line, we obtained the contours by applying the findContours() function. cv2.RETR_EXTERNAL, means that only the outer contours will be returned. For example, if an object has a hole inside it, it will not return the contour of that hole, it only returns the external contour.
cv2.CHAIN_APPROX_SIMPLE means that the approximated contour will be returned where possible. For example, for a square object, all the points around the boundary can be stored. However, if we use cv2.CHAIN_APPROX_SIMPLE, we simply store four vertices which can then be used to reconstruct the boundary of the square. This method will help reduce the number of boundar points.
Hierarchy: It contains information about the contour hierarchy. We have not used it in this example; we can now skip it. We will return to the hierarchy later in this section.
Line 9: We draw the contours using drawContours() method. The second parameter is the contours, and third value -1 means we want to draw all the contours. To draw a specific contour, we need to provide the index of that contour.
The output obtained for code-1 is shown in Figure 1.

Figure 1: Original image with contours drawn on top of each object (left), thresholded image(right).
Notice that only external contours are detected, this is due to the fact that we used retrieval mode as cv2.RETR_EXTERNAL.
Understanding Contour Hierarchy
In the above example, we have seen how to calculate the contours of the object using findContours() and draw them on the object using drawContours() method. This method is very robust and can be used with various varying parameters. One of the important parameters of the findContours() method in OpenCV is the contour retrieval mode. This is also associated with the contour hierarchy information returned by the findContours() method. In this section, we will explore more about hierarchy for better understanding.
In some images, the object may have a hole, and objects can be inside other objects. In this scenario, we need hierarchy information to find which objects are contained inside others.
In OpenCV, the hierarchy information is stored as an array of four values:
[Next, Previous, First Child, Parent]
Next: Represents the ID of the next contour at the same hierarchy level
Previous: Represents the index of the previous contour at the same hierarchy level.
First Child: Represents the index of the first child. The object may have an internal contour and/or another object inside it.
Parent: Represents the index of the parent contour. It means the object is contained in another object or is present inside another contour.
In all of the above cases, if there is not contour present for the next, previous, first child or parent then the index is set to -1.
Contour Retrieval Modes
In OpenCV, the contours can be retrieved in one of the following ways.
|
RETR_EXTERNAL
|
Retrieves only the extreme outer contours. It sets hierarchy[i][2]=hierarchy[i][3]=-1 for all the contours.
|
|
RETR_LIST
|
Retrieves all of the contours without establishing any hierarchical relationships. Which means, it will have both internal and external contours as well.
|
|
RETR_CCOMP
|
retrieves all of the contours and organizes them into a two-level hierarchy. At the top level, there are external boundaries of the components. At the second level, there are boundaries of the holes. If there is another contour inside a hole of a connected component, it is still put at the top level.
|
|
RETR_TREE
|
retrieves all of the contours and reconstructs a full hierarchy of nested contours.
|
Let us discuss all the possible contour retrieval methods one by one.
1. RETR_EXTERNAL
We already saw in the previous section the use of RETR_EXTERNAL. As the name suggests, when we use this flag, the findContours() method returns only the external contours of an object. The information about the hierarchy is stored as a list in the order shown below:
[Next, Previous, First Child, Parent]
Since RETR_EXTERNAL does not store any internal contours, therefore, is no information about the parent and first child in the hierarchy array. So, the values for these two are always set to -1. We can better understand by looking at Figure 2. We can see one circular object with a hole in the center. For our visualization, the external contour points of the circular object are shown in orange, while the internal contours are shown in green.

Figure 2. A circular object and its contour points. External contour points are orange in color, while the internal contour is green in color.
Let us look at an example that will detect only the external contour by setting the flag to RETR_EXTERNAL. We will also print the contours' hierarchy to understand better of how the hierarchy is stored. Code-2 shows an example of finding the external contours.
Code-2: Find the external contours using RETR_EXTERNAL
 1
 2
 3
 4
 5
 6
 7
 8
 9
10
11
12
13
14
15
16
17
18
19
20
21
|
import cv2
import numpy as np
import matplotlib.pyplot as plt
try:
    path = r'F:\img\circle3.jpg'
    img = cv2.imread(path,cv2.IMREAD_GRAYSCALE)
    img = cv2.GaussianBlur(img,(5,5),1)
    thresh, BW = cv2.threshold(img,200,255,cv2.THRESH_BINARY)
    contours, hierarchy = cv2.findContours(BW, cv2.RETR_EXTERNAL, cv2.CHAIN_APPROX_SIMPLE)
    temp = cv2.merge([img,img,img])
    cv2.drawContours(temp,contours,-1,(255,0,0),2)
    fig, axs = plt.subplots(1,2,figsize=(8,4))
    axs[0].imshow(BW,cmap='gray')
    axs[0].axis('off')
    axs[0].set_title('Original Image',fontsize='medium')
    axs[1].imshow(temp,cmap='gray')
    axs[1].axis('off')
    axs[1].set_title('RETR_EXTERNAL',fontsize='medium')
    print(hierarchy)
except Exception as e:
    print(str(e))
    print('Unable to read image.')
|
We have already described these lines of code many times. So let us only focus on the lines needed for this section.
Line 7: Performed Gaussian blurring to reduce noise (optional).
Line 8: The circle object is obtained by applying threholsing. Since background is black and circle is white so we used a higher value of threshold (200).
Line 9: The findContours() function is used to detect contours in the given image. cv2.RETR_EXTERNAL is used, which means only the external contours of the object are obtained, as shown in Figure 3. The obtained contours are stored in the contours object.
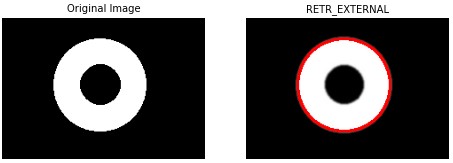
Figure 3. Use findContours() function to obtain contours of object using cv2.RETR_EXTERNAL. The right image is the detected contour shown in red color. Notice that the interal contour is not detected using cv2.RETR_EXTERNAL.
Also, the findContours() function returns the hierarchy. Line-19 prints the hierarcy information returned by this method for the object shown in Figure 3.
[ -1 -1 -1 -1 ]
Let us try to understand above output. Since there is only one row, this means that there is only one contour in the image. Obviously we can see that there is only one object
Next: The first value is for the next contour which is -1. This means that there not any next contour. In other words there is only one external contour in the image.
Previous: The second value returned in hierarch is the Previous contour which is also -1. This also indicates that there is no any conour previous to the current contour in the hierachy.
First Child: There is no first child, so it is also -1
Parent : There contour is no other contour around it so it is also -1
Example 2
Let us look at another example. The above code is executed for the input image shown in Figure 4. The output shows that there are three objects, hence three external contours are obtained. However, there are also two square objects inside the big object. When cv2.RETR_EXTERNAL is used, it does not detect those internal object boundaries.
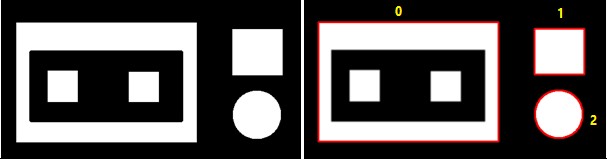
Figure 4. Input image (left), output image (right). For understanding, we have written contour index for each object obtain using findContours().
The hierarchy obtained for the above object is as shown below:
[ 1 -1 -1 -1]
[ 2 0 -1 -1]
[-1 1 -1 -1]
The hierarchy list now contains three rows corresponding to three objects which are obvious from the figure 4. We also put contour index on each object in Figure 4 for better understanding. Let us look at the first contour’s hierarchy information.
[ 1 -1 -1 -1]
Next: The first value is for the next contour is 1 which shows that the next contour is at index 1. We can deduce that there are more than one contour.
Previous: The Previous is -1, which means this is the first contour and there is no contour before this one.
First Child and Parent: Since cv2.RETR_EXTERNAL will only detect external contours, therefore, both first child and parent are set to -1 for all three contours.
In a similar fashion we can interpret other contours as well.
2. RETR_LIST
When this flag is set, it retrieves all contours but does not store any parent-child relationship, so they are just at the same level. Its parent and first child will always be -1. If we are not interested in maintaining the parent-child relationship, then we should use RETR_LIST.
Code-3 shows an example of how to use RETR_LIST.
Code-3: Find the contours using RETR_LIST
 1
 2
 3
 4
 5
 6
 7
 8
 9
10
11
12
13
14
15
16
17
18
19
20
21
22 | import cv2
import numpy as np
import matplotlib.pyplot as plt
try:
path = r'F:\img\rect2.jpg'
img = cv2.imread(path,cv2.IMREAD_GRAYSCALE)
img = cv2.GaussianBlur(img,(5,5),1)
thresh, BW = cv2.threshold(img,200,255,cv2.THRESH_BINARY)
contours, hierarchy = cv2.findContours(BW, cv2.RETR_LIST, cv2.CHAIN_APPROX_SIMPLE)
temp = cv2.merge([img,img,img])
cv2.drawContours(temp,contours,-1,(255,0,0),2)
fig, axs = plt.subplots(1,2,figsize=(16,6))
axs[0].imshow(BW,cmap='gray')
axs[0].axis('off')
axs[0].set_title('Original Image',fontsize='medium')
axs[1].imshow(temp,cmap='gray')
axs[1].axis('off')
axs[1].set_title('RETR_EXTERNAL',fontsize='medium')
print(hierarchy)
except Exception as e:
print(str(e))
print('Unable to read image.')
|
Code-3 is exactly the same code as we have shown in code-2, except for Line-7. Here we used RETR_LIST, which not only extracts the external contours but it also extracts the internal contours. However, we cannot identify which is internal and which is external contour. Therefore, in the hierarchy information returned by findContours() function, the First Child and Parent values are always set to -1.
The output obtained for this code-3 is shown in Figure 5.

Figure 5: All contour hierarchies are obtained without any parent-child relationship. .
We can see all external and child object’s contours. For the large rectangle, we can see that there are two small squares inside it. With RETR_LIST, we can also detect the boundries of those objects.
The hierarchy printed on Line 19 shows the following output.
[ 1 -1 -1 -1]
[ 2 0 -1 -1]
[ 3 1 -1 -1]
[ 4 2 -1 -1]
[ 5 3 -1 -1]
[-1 4 -1 -1]
We can see that there are six contours which can be seen in Figure 5, which includes both internal and external contours. Notice that, unlike RETR_EXTERNAL, RETR_LIST detects all internal and external contours, and stores that information in the contours object.
3. RETR_CCOMP
When this flag is set, it also retrieves all the contours, but unlike RETR_LIST, it stores the hierarchy information at just two levels: External and internal. So using this flag, we can distinguish between internal boundaries and external ones. All the external contours are placed at hierarchy 1, and internal contours are placed in hierarchy 2. If an object is inside another object, its hierarchy will also be defined at these two levels independent of its parent.
Let us look at an example. The following code shows the usage of RETR_CCOMP. As shown in Figure 6, we displayed the external contours (level 1) and internal (level 2) contours separately.
Code-4: Find the contours using RETR_CCOMP
 1
 2
 3
 4
 5
 6
 7
 8
 9
10
11
12
13
14
15
16
17
18
19
20
21
22
23
24
25
26 | import cv2
import numpy as np
import matplotlib.pyplot as plt
try:
path = r'F:\img\rect2.jpg'
img = cv2.imread(path,cv2.IMREAD_GRAYSCALE)
img = cv2.GaussianBlur(img,(5,5),1)
thresh, BW = cv2.threshold(img,80,255,cv2.THRESH_BINARY)
contours, hierarchy = cv2.findContours(BW, cv2.RETR_CCOMP, cv2.CHAIN_APPROX_SIMPLE)
temp = cv2.merge([img,img,img])
rows = hierarchy[0].shape[0]
for i in range(rows):
if (hierarchy[0][i][3]==-1):
cv2.drawContours(temp,contours,i,(0,255,0),2)
else:
cv2.drawContours(temp,contours,i,(255,0,0),3)
fig, axs = plt.subplots(1,2,figsize=(16,6))
axs[0].imshow(BW,cmap='gray')
axs[0].axis('off')
axs[0].set_title('Original Image',fontsize='medium')
axs[1].imshow(temp)
axs[1].axis('off')
axs[1].set_title('RETR_EXTERNAL',fontsize='medium')
print(hierarchy)
except Exception as e:
print(str(e))
print('Unable to read image.')
|
This code is similar to Code-3, with a few exceptions described below.
Line 9: We changed the parameters to cv2.RETR_CCOMP.
Line 10: we merge three grayscale images to make it a color image so that colorful contours can be shown.
Line 11: The hierarchy contains how many objects there are. Since there is only one hierarchy (hierarchy[0]) information expected inside which we have many contours, so we get the number of rows using hierarchy[0].shape[0].
Line 12: We loop through all the rows in the hierarchy.
Line 13-16: We find all contours with no parent, i.e., external contours. This is achieved by checking the Parent is equal to -1 in the hierarchy object. For example, in this hierarchy of objects [ 3 0 2 -1], the last element is -1, which means it has no parent, so it is an external contour.
If the parent is -1, then we display the contour in green, and if the parent is not -1, we display the contour in red.
The output obtained for Code-4 is shown in Figure 6. As we described that cv2.RETR_CCOMP detects all contours but with only Prent-Child relationships at one level. Let us try to understand this with an example. From Figure 6, consider the circle and square. As they are not contained inside another object (no parent), their parent=-1, so their contours are displayed in green color. For the large rectangle, we can see that its external boundary is displayed in green while its child contour is in red color. For the external contour parent=-1 while for the child contour, parent is not -1, so displayed in red. Similarly, we can see the same behavior for the hexagon present inside the large rectangle. Its external contour is green, while internal contour is in red color. Also, we can see that the rectangle has only external contour in green.
Notice that cv2.RETR_CCOMP only tells us if the contour is external or internal (parent or child); it does not care if the object is inside another object or not. If we are interested only in external or internal, then we should use cv2.RETR_CCOMP. However, in some situations, we need full details if the object is inside another object or not; then, we need to use RETR_TREE, which we describe in the next section.
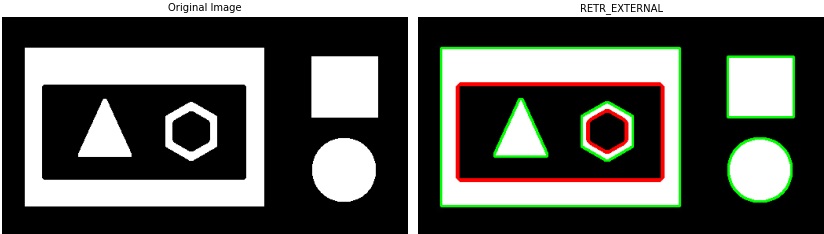
Figure 6: All contour hierarchies are obtained using RETR_CCOMP.
The hierarchy information displayed is as below
[ 1 -1 -1 -1 ]
[ 3 0 2 -1 ]
[ -1 -1 -1 1 ]
[ 4 1 -1 -1 ]
[ 5 3 -1 -1 ]
[ -1 4 6 -1 ]
[ -1 -1 -1 5 ]
The hierarchy contains information of seven contours. It is also clear from Figure 6 that there is a total of six contours, including both internal and external. Notice that cv2.RETR_CCOMP only tells us if the contour is external or internal (parent or child); it does not care if the object is inside another object or not. If we are interested only in external or internal, then we should use cv2.RETR_CCOMP. However, in some situations, we need full details if the object is inside another object or not; then, we need to use RETR_TREE, which we describe in the next section.
4. RETR_TREE
This mode is used when we want detailed information about all the contours with the full hierarchy, i.e., it contains all details about child-parent relationships. We can even identify which objects are inside other objects, and their hierarchy information is maintained accordingly.
Let us use RETR_TREE in findContours() method. Code 5 shows an example of the usage of RETR_TREE flag.
Code-5: Find the contours using RETR_TREE
 1
 2
 3
 4
 5
 6
 7
 8
 9
10
11
12
13
14
15
16
17
18
19
20
21
22
23
24
25
26 | import cv2
import numpy as np
import matplotlib.pyplot as plt
try:
path = r'F:\img\rect2.jpg'
img = cv2.imread(path,cv2.IMREAD_GRAYSCALE)
img = cv2.GaussianBlur(img,(5,5),1)
thresh, BW = cv2.threshold(img,80,255,cv2.THRESH_BINARY)
contours, hierarchy = cv2.findContours(BW, cv2.RETR_TREE, cv2.CHAIN_APPROX_SIMPLE)
temp = cv2.merge([img,img,img])
rows = hierarchy[0].shape[0]
for i in range(rows):
if (hierarchy[0][i][3]==-1):
cv2.drawContours(temp,contours,i,(0,255,0),2)
else:
cv2.drawContours(temp,contours,i,(255,0,0),3)
fig, axs = plt.subplots(1,2,figsize=(16,6))
axs[0].imshow(BW,cmap='gray')
axs[0].axis('off')
axs[0].set_title('Original Image',fontsize='medium')
axs[1].imshow(temp)
axs[1].axis('off')
axs[1].set_title('RETR_EXTERNAL',fontsize='medium')
print(hierarchy)
except Exception as e:
print(str(e))
print('Unable to read image.')
|
In Code-5, only in Line-9, the parameter is set to cv2.RETR_TREE while the rest of the code is the same. The output obtained for the above code is shown in the following Figure 7. Notice the difference between output for cv2.RETR_CCOMP shown in Figure 6 and cv2.RETR_TREE in Figure 7. Mainly see how they handle the internal contours present inside the large rectangle. In RETR_TREE we can find if the object is contained inside another object or not. Since both triangle and hexagon are inside the rectangle, all boundaries are marked in red.
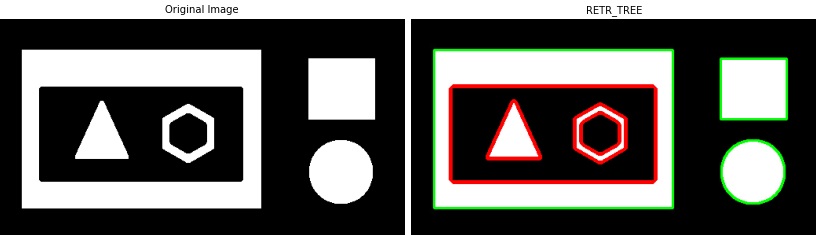
Figure 7: All contour hierarchies are obtained using RETR_TREE.
The hierarchy information returned by findContours() when the RETR_TREE is used is shown below:
[ 1 -1 -1 -1]
[ 2 0 -1 -1]
[-1 1 3 -1]
[-1 -1 4 2]
[ 6 -1 5 3]
[-1 -1 -1 4]
[-1 4 -1 3]
There are total of seven contours. You can see that it maintains proper information on the next (first column), previous (2nd column), first child (3rd column), and parent (last column). If you need complete information about the contours, then the RETR_TREE is the best option.
Contour Approximation Method