Working with the Region of Interest (ROI) in Images
Sometimes we are interested in some parts of the image rather than working in the whole image region. This small region is what we call it Region of interest or, in short, ROI. We learned about accessing pixel values from a particular location in the previous section. However, here we want to access more than one pixel at a time. Naturally, we should mention the start of the location from where we want to start reading pixels and the end location. In other words, we select a rectangular region to access or modify the pixel values. For instance, we want to read the pixel values shown in the rectangular region below:
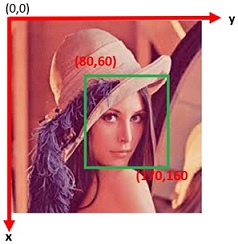
Figure 1. Image coordinate system.
To select this ROI, we must mention the range of rows (80:170) and columns (60:160) which makes our region of interest. The following code example shows how we can select the region as shown above:
1
2
3
4
5
6
7
8
|
import cv2
import numpy as np
path = r'F:\img\lena.jpg'
img = cv2.imread(path,cv2.IMREAD_COLOR)
ROI = img[80:170, 60:160,:]
cv2.imshow('ROI',ROI)
cv2.waitKey(0)
cv2.destroyAllWindows()
|
Similarly, we can also manipulate the ROI. The following lines of code show how we can set the pixel values within the ROI to 0.Similarly, we can also manipulate the ROI. The following lines of code show how we can set the pixel values within the ROI to 0.
1
2
3
4
5
6
7
8
|
import cv2
import numpy as np
path = r'F:\img\lena.jpg'
img = cv2.imread(path,cv2.IMREAD_COLOR)
img[80:170, 60:160,:] = 0
cv2.imshow('ROI',img)
cv2.waitKey(0)
cv2.destroyAllWindows()
|
In line 5, we see that the range of value defined by ROI is zero to zero. The result is shown as below in the figure.
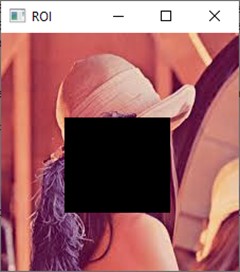
Figure 2. Using ROI, working on a specific region of image.